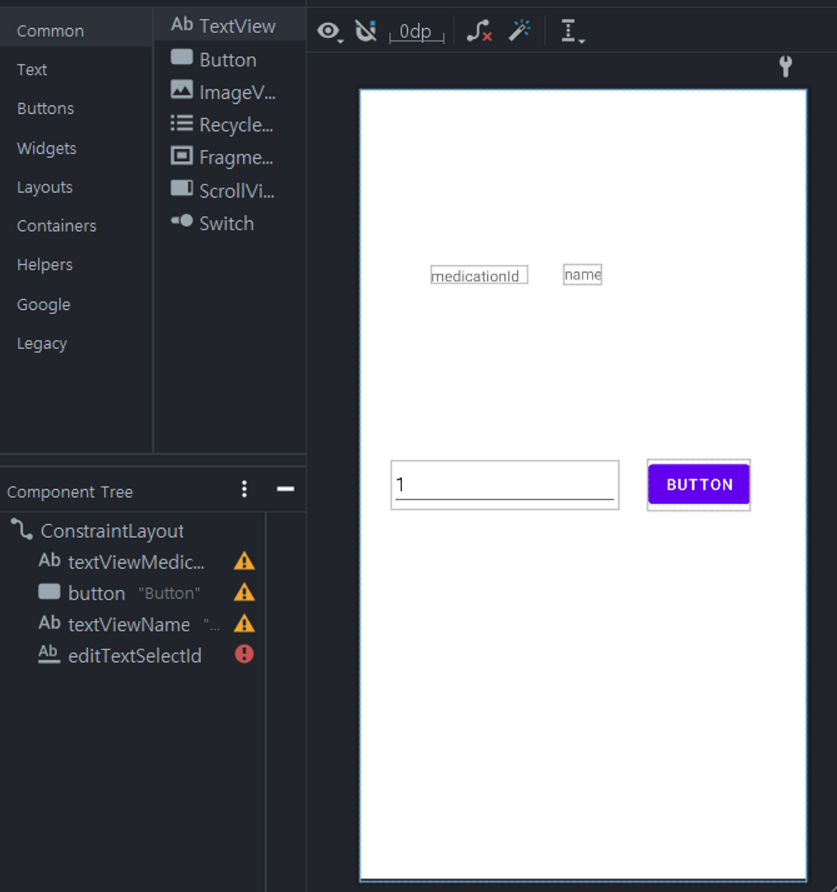
1. 의존성 추가

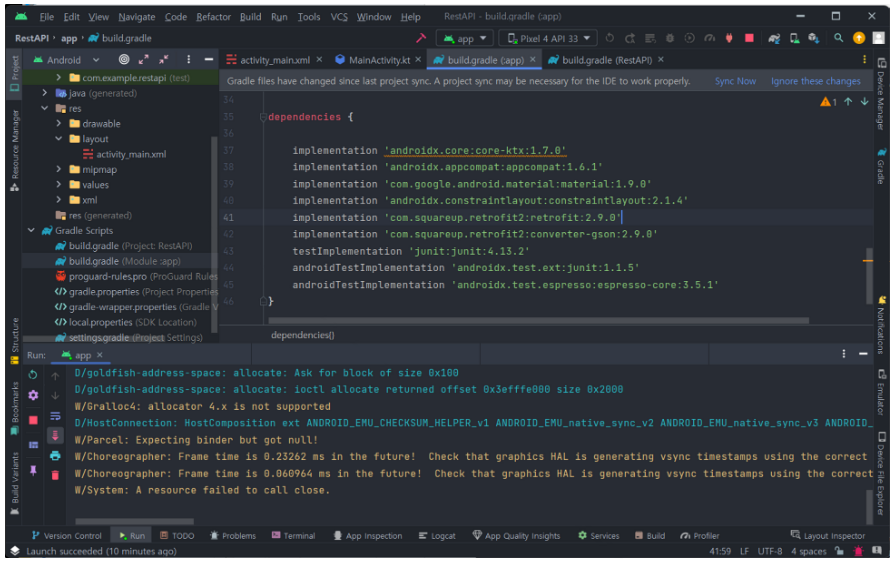
Rest Api를 사용하는데 있어 다양한 라이브러리가 존재하지만 여기서는 가장 속도가 빠른 Retrofit를 사용할 계획이다.

https://mvnrepository.com/artifact/com.squareup.retrofit2/converter-gson

https://mvnrepository.com/artifact/com.squareup.retrofit2/retrofit

해당 링크에서 최신 버전을 클릭 후 Gradle (Short)의 내용을 사용을 권장합니다.

implementation 'com.squareup.retrofit2:retrofit:2.9.0'
implementation 'com.squareup.retrofit2:converter-gson:2.9.0'

plugins {
    id 'com.android.application'
    id 'org.jetbrains.kotlin.android'
}

android {
    namespace 'com.example.restapi'
    compileSdk 33

    defaultConfig {
        applicationId "com.example.restapi"
        minSdk 23
        targetSdk 33
        versionCode 1
        versionName "1.0"

        testInstrumentationRunner "androidx.test.runner.AndroidJUnitRunner"
    }

    buildTypes {
        release {
            minifyEnabled false
            proguardFiles getDefaultProguardFile('proguard-android-optimize.txt'), 'proguard-rules.pro'
        }
    }
    compileOptions {
        sourceCompatibility JavaVersion.VERSION_1_8
        targetCompatibility JavaVersion.VERSION_1_8
    }
    kotlinOptions {
        jvmTarget = '1.8'
    }
}

dependencies {

    implementation 'androidx.core:core-ktx:1.7.0'
    implementation 'androidx.appcompat:appcompat:1.6.1'
    implementation 'com.google.android.material:material:1.9.0'
    implementation 'androidx.constraintlayout:constraintlayout:2.1.4'
    implementation 'com.squareup.retrofit2:retrofit:2.9.0'
    implementation 'com.squareup.retrofit2:converter-gson:2.9.0'
    testImplementation 'junit:junit:4.13.2'
    androidTestImplementation 'androidx.test.ext:junit:1.1.5'
    androidTestImplementation 'androidx.test.espresso:espresso-core:3.5.1'
}

위의 Sync Now 버튼 클릭

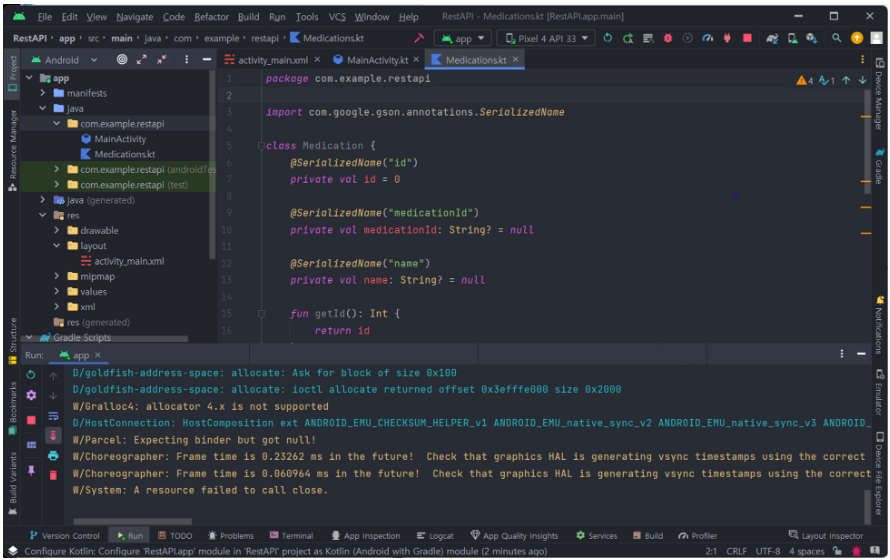
2. Entity용 코틀린 클래스 추가 (Medications)

Spring Boot와 Mysql 데이터 베이스에서 사용할 엔티티와 동일하게 맞추어야 함! (중요)

package com.example.restapi

import com.google.gson.annotations.SerializedName

class Medication {
    @SerializedName("id")
    private val id = 0

    @SerializedName("medicationId")
    private val medicationId: String? = null

    @SerializedName("name")
    private val name: String? = null

    fun getId(): Int {
        return id
    }

    fun getMedicationId(): String? {
        return medicationId
    }

    fun getName(): String? {
        return name
    }
    // toString()을 Override 해주지 않으면 객체 주소값을 출력함
    override fun toString(): String {
        return "Result{" +
                "id=" + id +
                ", body='" + medicationId + '\\'' +
                ", name='" + name + '\\'' +
                '}'
    }
}
3. RestAPI용 인터페이스 생성

medications/id의 url을 통해 id 정보를 받아 데이터 베이스에서 해당 id의 스키마를 객체로 가져오도록 설계 (ORM)

package com.example.restapi

import retrofit2.Call
import retrofit2.http.GET
import retrofit2.http.Path

interface MyApi {
    @GET("medications/{id}")
    fun getMedication(@Path("id") id: Int): Call<Medication>
}

4. MainActivity 코드 작성

주의!: 서버를 우리가 사용하는 컴퓨터에서 직접 실행할 때 사용하는 http://localhost:포트번호(http://127.0.0.1:포트번호)를 사용하지 않고 특별한 url인 http://10.0.2.2:포트번호 을 사용해야 한다.

이유는 안드로이드 에뮬레이터는 본인의 컴퓨터와는 별도의 컴퓨터로 동작하기 때문이다.

그렇기에 본인의 컴퓨터를 가르키는 url을 사용하면 애뮬레이터에 접근 할 수 없기 때문에 우리는 안드로이드 애뮬레이터에서만 사용되는 특별한 주소 http://10.0.2.2:포트번호를 사용해야 한다.

+우리는 Spring-Boot 안에 내장되어 있는 톰캣 서버를 사용하기 때문에 8080 포트를 사용한다.

package com.example.restapi

import android.os.Bundle
import android.widget.Button
import android.widget.EditText
import android.widget.TextView
import androidx.appcompat.app.AppCompatActivity
import kotlinx.coroutines.CoroutineScope
import kotlinx.coroutines.Dispatchers
import kotlinx.coroutines.launch
import kotlinx.coroutines.withContext
import retrofit2.Retrofit
import retrofit2.converter.gson.GsonConverterFactory

class MainActivity : AppCompatActivity() {
		// url 정보 세팅
    private val api = Retrofit.Builder()
        .baseUrl("http://10.0.2.2:8080")
        .addConverterFactory(GsonConverterFactory.create())
        .build()
        .create(MyApi::class.java)

    override fun onCreate(savedInstanceState: Bundle?) {
        super.onCreate(savedInstanceState)
        setContentView(R.layout.activity_main)
				// 버튼을 클릭하면 editTextSelectId에 입력된 정수를 id로 사용하여 fectchData()함수를 사용한다.
        var button = findViewById<Button>(R.id.button).setOnClickListener {
            val id = findViewById<EditText>(R.id.editTextSelectId).text.toString().toInt()
            fetchData(id)
        }
    }
		// 서버를 통해 해당 id에 대응 하는 데이터베이스 스키마의 값을 가지고 온다.
    private fun fetchData(id:Int) {
        var textViewMedication = findViewById<TextView>(R.id.textViewMedicationId)
        var textViewName = findViewById<TextView>(R.id.textViewName)
        CoroutineScope(Dispatchers.IO).launch {
            val response = api.getMedication(id).execute()

            withContext(Dispatchers.Main) {
                if (response.isSuccessful) {
                    val medication = response.body()
                    if (medication != null) {
                        textViewMedication.setText(medication.getMedicationId())
                        textViewName.setText(medication.getName())
                    }
                } else {
                    // TODO: Handle error
                }
            }
        }
    }
}

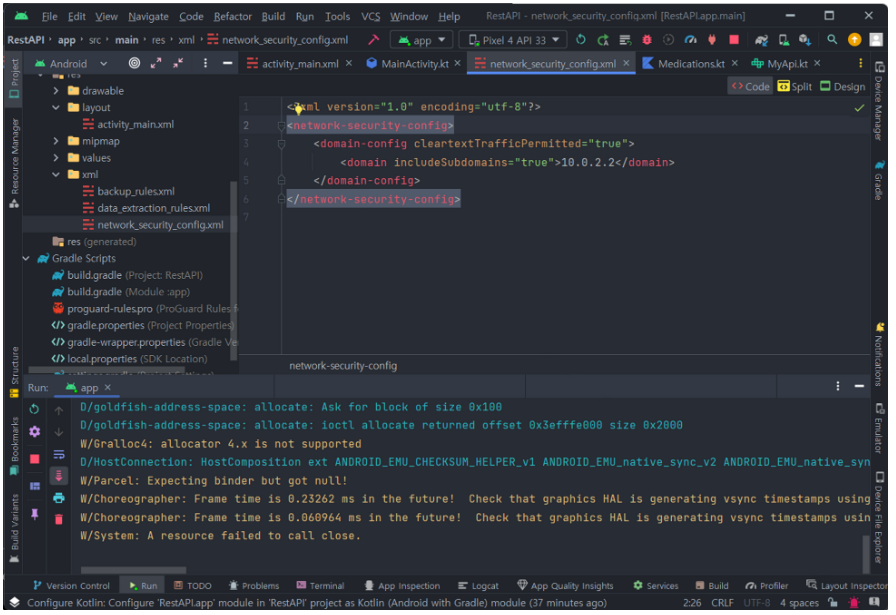
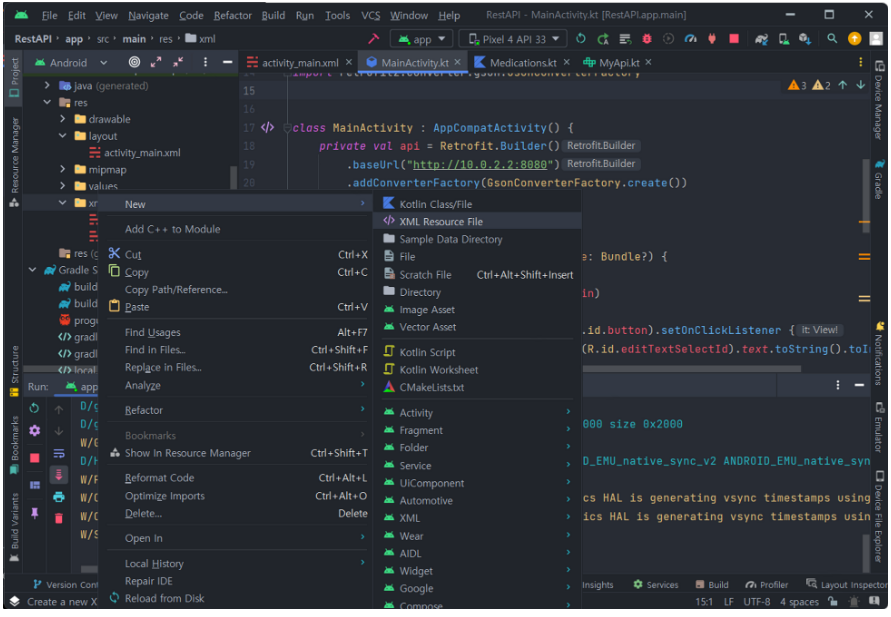
5. network_security_config.xml 작성

안드로이드 9(Pie) 이후 버전에서는 암호화되지 않은 네트워크 트래픽이 중간에서 가로채어질 수 있는 위험성을 줄이기 위해 HTTP 트래픽에 대한 접근을 기본적으로 차단한다.

따라서 개발자는 서버와 안드로이드 앱 간의 통신에 HTTPS를 사용해야 하는데 지금 개발 과정에서는 HTTPS를 설정하지 않은 로컬 서버를 사용하기 때문에 별도의 설정 파일로 HTTP 트래픽을 허용하도록 해야 한다.

<?xml version="1.0" encoding="utf-8"?>
<network-security-config>
    <domain-config cleartextTrafficPermitted="true">
        <domain includeSubdomains="true">10.0.2.2</domain>
    </domain-config>
</network-security-config>
6. AndroidMainfest.xml 파일 수정

위에서 작성한 예외 보안그룹의 정보를 설정파일에 입력해 주어야 한다.

<application
	.
	.
	.
	android:networkSecurityConfig="@xml/network_security_config"
	.
	.
	.
</application>

<추가한 뒤 전체 코드>

<?xml version="1.0" encoding="utf-8"?>
<manifest xmlns:android="http://schemas.android.com/apk/res/android"
    xmlns:tools="http://schemas.android.com/tools">
    <uses-permission android:name="android.permission.INTERNET" />
    <application
        android:allowBackup="true"
        android:dataExtractionRules="@xml/data_extraction_rules"
        android:fullBackupContent="@xml/backup_rules"
        android:icon="@mipmap/ic_launcher"
        android:label="@string/app_name"
        android:supportsRtl="true"
        android:networkSecurityConfig="@xml/network_security_config"
        android:theme="@style/Theme.RestAPI"
        tools:targetApi="31">
        <activity
            android:name=".MainActivity"
            android:exported="true">
            <intent-filter>
                <action android:name="android.intent.action.MAIN" />

                <category android:name="android.intent.category.LAUNCHER" />
            </intent-filter>
        </activity>
    </application>

</manifest>

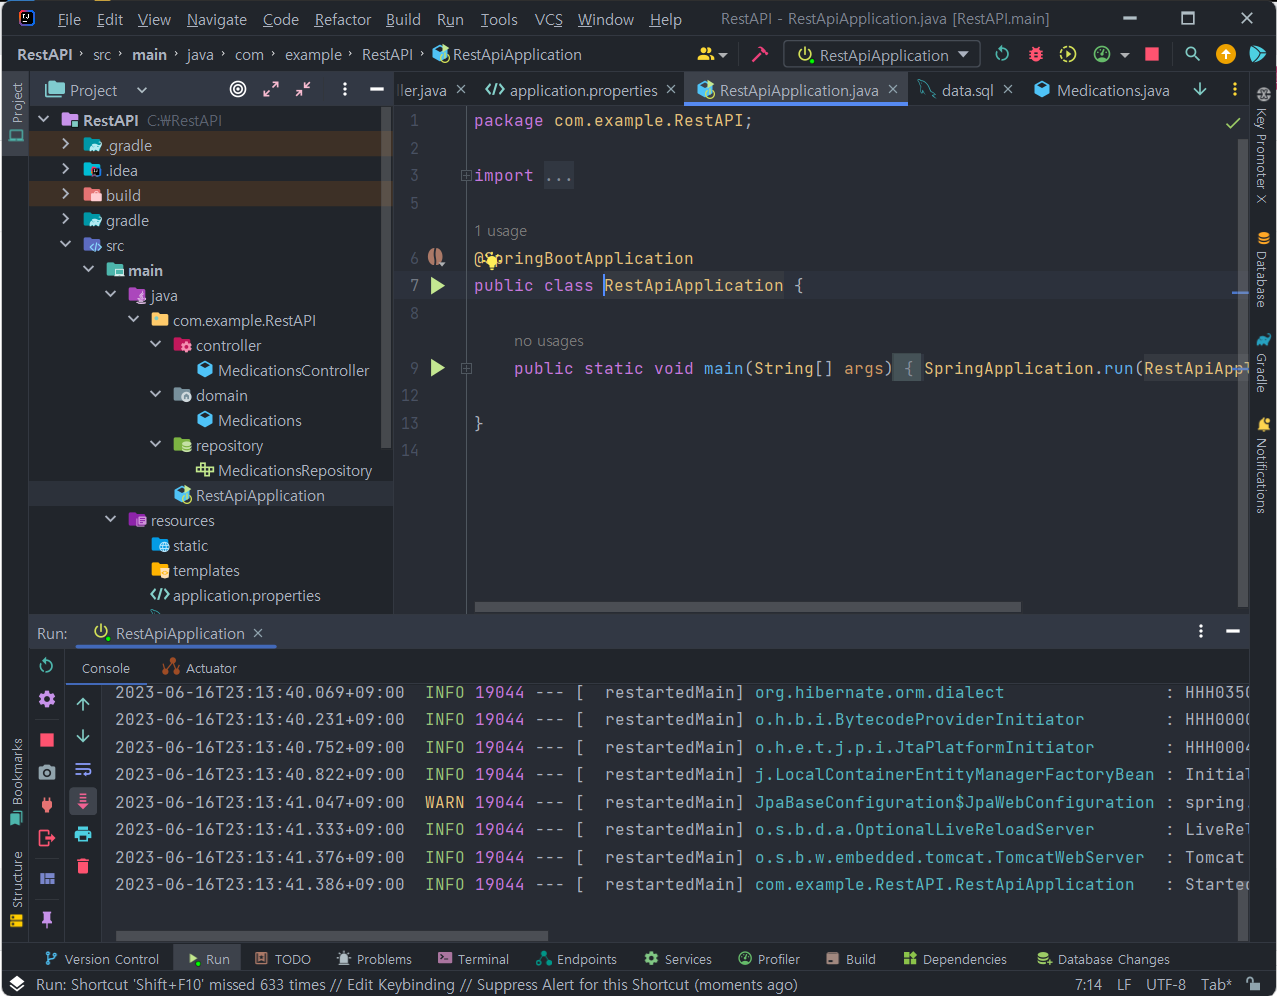
7. 안드로이드 프로그램 실행, Spring Boot 실행, MySQL Workbench 확인

성공!

1. Empty Activity 프로젝트 생성

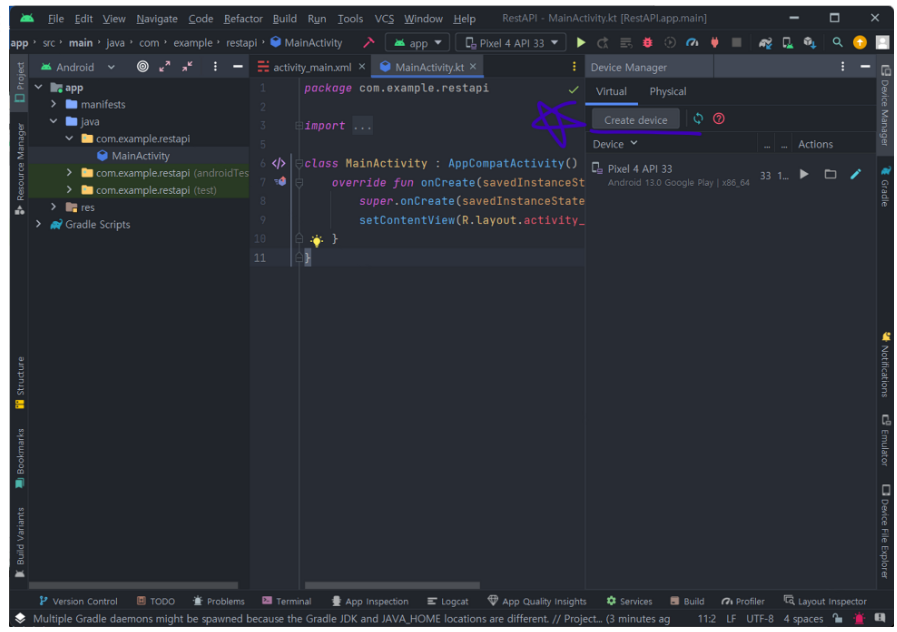
2. Device Manager 추가

저는 미리 Create device 버튼을 통해 생성한 상태라 Pixel 4 API 33이 이미 존재하는 상태입니다.

3. app/res/layout/activity_main.xml 작업

<?xml version="1.0" encoding="utf-8"?>
<androidx.constraintlayout.widget.ConstraintLayout xmlns:android="http://schemas.android.com/apk/res/android"
    xmlns:app="http://schemas.android.com/apk/res-auto"
    xmlns:tools="http://schemas.android.com/tools"
    android:layout_width="match_parent"
    android:layout_height="match_parent"
    tools:context=".MainActivity">

    <TextView
        android:id="@+id/textViewMedicationId"
        android:layout_width="90dp"
        android:layout_height="16dp"
        android:layout_marginStart="32dp"
        android:text="medicationId"
        app:layout_constraintBottom_toTopOf="@+id/button"
        app:layout_constraintEnd_toStartOf="@+id/textViewName"
        app:layout_constraintStart_toStartOf="parent"
        app:layout_constraintTop_toTopOf="parent" />

    <Button
        android:id="@+id/button"
        android:layout_width="wrap_content"
        android:layout_height="wrap_content"
        android:text="Button"
        app:layout_constraintBottom_toBottomOf="parent"
        app:layout_constraintEnd_toEndOf="parent"
        app:layout_constraintHorizontal_bias="0.451"
        app:layout_constraintStart_toEndOf="@+id/textViewName"
        app:layout_constraintTop_toTopOf="parent" />

    <TextView
        android:id="@+id/textViewName"
        android:layout_width="wrap_content"
        android:layout_height="wrap_content"
        android:text="name"
        app:layout_constraintBottom_toTopOf="@+id/button"
        app:layout_constraintEnd_toEndOf="parent"
        app:layout_constraintStart_toStartOf="parent"
        app:layout_constraintTop_toTopOf="parent" />

    <EditText
        android:id="@+id/editTextSelectId"
        android:layout_width="wrap_content"
        android:layout_height="wrap_content"
        android:ems="10"
        android:inputType="textPersonName"
        android:text="1"
        app:layout_constraintBottom_toBottomOf="parent"
        app:layout_constraintEnd_toStartOf="@+id/button"
        app:layout_constraintStart_toStartOf="parent"
        app:layout_constraintTop_toTopOf="parent" />

</androidx.constraintlayout.widget.ConstraintLayout>

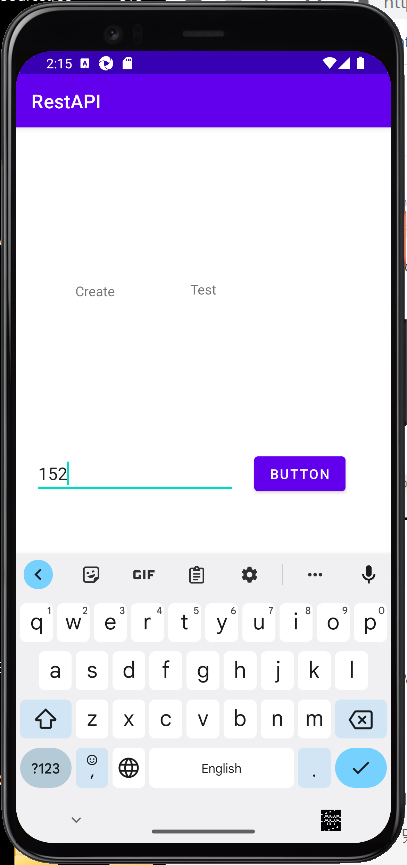
4. 테스트 프로그램 실행

해당 화면이 나온다면 성공~!

브로드캐스트 리시버

<동적 권한 요청>

private fun requestSinglePermission(permission: String) { // 한번에 하나의 권한만 요청하는 예제
        if (checkSelfPermission(permission) == PackageManager.PERMISSION_GRANTED) // 권한 유무 확인
            return
        val requestPermLauncher = registerForActivityResult(ActivityResultContracts.RequestPermission()) { // 권한 요청 컨트랙트
            if (it == false) { // permission is not granted!
// 사용자가 요청 거부했을 경우 처리
            }
        }
        if (shouldShowRequestPermissionRationale(permission)) { // 권한 설명 필수 여부 확인
// 다이얼로그 등으로 사용자에게 권한 필요한 이유 설명
        } else {
// should be called in onCreate()
            requestPermLauncher.launch(permission) // 권한 요청 시작
        }
    }
inner class MyBroadcastReceiver : BroadcastReceiver(){
        override fun onReceive(context: Context?, intent: Intent?) {
            // TO DO SOMTHING
            when(intent?.action){
                Intent.ACTION_POWER_CONNECTED -> {}
                else -> { }
            }
        }

    }
override fun onStart() {
        super.onStart()
        val ifilter = IntentFilter()
        ifilter.addAction(Intent.ACTION_POWER_CONNECTED)
        ifilter.addAction("MY Broadcast Msg")
        registerReceiver(myBroadcastReceiver, ifilter)
    }

    override fun onStop() {
        super.onStop()
        unregisterReceiver(myBroadcastReceiver)
    }
  • 시스템이나 다른 앱이 방송하는 메시지를 받는 리시버
  • 시스템 이벤트시 방송
    • 시스템 부트 완료, 충전 시작, 네트워크 연결 변경, 문자 수신 등의 이벤트
    • 문자 수신과 같은 민감한 정보는 권한을 필요로 함
  • 사용 방법
    • BroadcastReceiver 상속한 클래스, onReceive() 재정의
    • registerReceiver()로 1번의 클래스 객체 등록
    • 더 이상 수신할 필요가 없을 때 unregisterReceiver() 호출

Content Provider

  • 다른 앱에 데이터를 제공해주기 위해 표준화된 인터페이스
  • 적절한 데이터 은닉과 보호 기능을 제공

Content Resolver

val button2 = findViewById<Button>(R.id.button2)
        button2.setOnClickListener {
           if(checkSelfPermission(Manifest.permission.READ_CALL_LOG)== PackageManager.PERMISSION_GRANTED){
               val cursor = contentResolver.query(
                   CallLog.Calls.CONTENT_URI,
                   arrayOf(CallLog.Calls._ID, CallLog.Calls.NUMBER),
                   null,
                   null,
                   null
               )
               val idxWord = cursor?.getColumnIndex(CallLog.Calls.NUMBER)?:0
               val str = java.lang.StringBuilder()
               while(cursor?.moveToNext() == true){
                   str.append(cursor.getString(idxWord))
               }
               cursor?.close()
               textView.text = str
           }
        }

cursor = query(
	android.net.Uri uri, // Content URI
	String[] projection, // 가져올 테이블의 컬럼 이름
	String selection, // 조건, SQL의 WHERE 절과 비슷
	String[] selectionArgs, // selection의 ?에 들어갈 인자
	String sortOrder) // SQL의 ORDER BY에 해당
cursor.moveToNext() // 다음 로그 작업 수행
컬럼 인덱스 = cursor.getColumnIndex(컬럼 이름)
cursor.getString(컬럼 인덱스), cursor.getLong(컬럼 인덱스)
  • ContentProvider에 접근하기 위한 방법
  • CRUD- CREATE, READ, UPDATE, DELETE
  • 사용 방법(데이터 읽기, Retrieve)
    • Context에서 ContentResolver 객체 가져오기
    • query로 컨텐트 URI와 조건 등을 명시해서 실행, cursor 리턴
    • cursor를 사용하여 데이터 읽기
  • 데이터 Create Update Delete는 query대신 insert, update, delete를 사용

Content URI

if(checkSelfPermission(Manifest.permission.READ_CALL_LOG)== PackageManager.PERMISSION_GRANTED){
               val cursor = contentResolver.query(
                   CallLog.Calls.CONTENT_URI,
                   arrayOf(CallLog.Calls._ID, CallLog.Calls.NUMBER),
                   null,
                   null,
                   null
               )
               val idxWord = cursor?.getColumnIndex(CallLog.Calls.NUMBER)?:0
               val str = java.lang.StringBuilder()
               while(cursor?.moveToNext() == true){
                   str.append(cursor.getString(idxWord))
               }
               cursor?.close()
               textView.text = str
           }
  • query, insert, update, delete 모두 첫 번째 인자가 Content URI
  • Content URI는 접근하려는 content provider의 주소
    • content://제공자의이름/테이블경로 와 같은 형태
      • CallLog.Calls.CONTENT_URI
      • MediaStore.Images.Media.EXTERNAL_CONTENT_URI

코루틴

  • 코틀린에서 병행(비동기) 수행을 프로그래밍하는 방법
  • 스레드를 직접 다루지 않고 편리하게 사용하는 방법
  • 가볍고 취소가 가능하며 Jetpack에서 코루틴을 이용한 API를 제공한다.
  • 스레드 풀에 존재하는 스레드를 가져다 쓰는 방식

코루틴 사용법

val textView by lazy { findViewById<TextView>(R.id.textView) }
private lateinit var scope: CoroutineScope
    private fun startCoroutine() {
        scope.launch {
            for(i in 1..10){
                delay(1000)
                withContext(Dispatchers.Main){
                    textView.text = "$i"
         
       }
            }
        }
        scope.launch {
            for(i in 10 .. 20){
                delay(1000)
                withContext(Dispatchers.Main){
                    textView.text = "$i"
                }
            }
        }
    }
    private fun stopCoroutine() = scope.cancel
  • 코루틴 범위(CoroutineScope)를 생성, 지정: CoroutineScope(Dispatchers.Default)
  • 코루틴 생성: lanch
  • 코루틴 컨텍스트: Dispatcher 지정(어느 스레드에서 수행할 지 결정)

안드로이드 앱 컴포넌트

  • 액티비티: 사용자 UI를 제공하는 컴포넌트
  • 서비스: 백그라운드에서 수행할 작업을 위한 컴포넌트
  • 브로드캐스트 수신자: 다양한 이벤트(인텐트)를 수신하기 위한 컴포넌트
  • 컨텐트 제공자: 다른 앱과 공유할 데이터를 관리하고 제공하는 컴포넌트

서비스

class MainActivity : AppCompatActivity() {
    val textView by lazy { findViewById<TextView>(R.id.textView) }

    override fun onCreate(savedInstanceState: Bundle?) {
        super.onCreate(savedInstanceState)
        setContentView(R.layout.activity_main)
				
        val buttonGetCount = findViewById<Button>(R.id.buttonGetCount)
        buttonGetCount.setOnClickListener {
            textView.text = "count: ${myService?.count}"
        }
    }

    private var myService : MyService? = null
    private val serviceConnection = object : ServiceConnection{
				// 2. Bind 된 서비스 사용
        override fun onServiceConnected(name: ComponentName?, service: IBinder?) {
            myService = (service as MyService.LocalBinder).getService()
        }

        override fun onServiceDisconnected(name: ComponentName?) {
            myService = null
        }
    }
		override fun onStart() {
        super.onStart()
        val intent = Intent(this,MyService::class.java)
				// 1. 서비스 Bind
        bindService(intent,serviceConnection, BIND_AUTO_CREATE)
    }

    override fun onStop() {
        super.onStop()
				// 3. 서비스 종료후 Bind 해제
        unbindService(serviceConnection)
    }
class MyService : Service(){
		// Bound 서비스
    private val binder = LocalBinder()
		// MyClass가 정의가 먼져 되어야 하기 때문에 inner 클래스로 생
    inner class LocalBinder: Binder(){
				// Bound 서비스 객체 제공
        fun getService() = this@MyService
    }
		// 로컬바인드 객체를 가지고 있다 리턴 하는 함수 
    override fun onBind(intent: Intent?): IBinder? {
        return binder
    }

    override fun onCreate() {
        super.onCreate()

        if(Build.VERSION.SDK_INT>= Build.VERSION_CODES.O){
            createNotificationChannel() // 알림 채널 생성
        }
    }
		// 백그라운드 서비스
    override fun onStartCommand(intent: Intent?, flags: Int, startId: Int): Int {
				startForeground(notificationID, createNotification()) // 포그라운드 서비스
		    // TO DO
        return super.onStartCommand(intent, flags, startId)
    }

		private val channelID = "default"
    private val notificationID = 1
		// 알림 코드 
    @RequiresApi(Build.VERSION_CODES.O)
    private fun createNotificationChannel() {
				// 채널 아이디, 채널 이름
        val channel = NotificationChannel(channelID, "default channel",
            NotificationManager.IMPORTANCE_DEFAULT)
        channel.description = "description text of this channel."
				// 채널 생성
        NotificationManagerCompat.from(this).createNotificationChannel(channel)
    }
		// 알림의 모양을 결정하는 함수 
		private fun createNotification(progress: Int = 0) = NotificationCompat.Builder(this, channelID)
        .setContentTitle("MyService")
        .setContentText("Service is running...")
        .setSmallIcon(R.drawable.icon)
        .setOnlyAlertOnce(true) // importance 에 따라 알림 소리가 날 때, 처음에만 소리나게 함
        .setProgress(100, progress, false)
        .build()
}
  • 안드로이드 앱 컴포넌트 중 하나로 백그라운드에서 수행할 작업을 위한 컴포넌트
  • 원칙적으로 사용자 인터페이스를 제공하지 않음
  • Started 서비스
    • Foreground 서비스: 알림(Notification)을 띄우고 사용자에게 상태를 보여주면서 동작하는 서비스 startForeground() 호출
    • Background 서비스: UI 전혀 제공하지 않는 서비스 onStartCommand() 재정의
  • 바운드 서비스: 클라이언트-서버와 유사 등록하고 요청하면 해당 함수를 호출하는 방식

권한

  • 제한된 정보나 행위를 접근/수행하기 위해 권한 필요
  • 권한이 없는 앱이 특정 정보에 접근하려고 하면 예외 발생
  • 해당 정보 접근에 필요한 권한을 앱에 부여해야 함
  • 부여 방법: 설치시 권한 부여, 동적 권한 부여

동적 권한 부여

<resources>
    <string name="app_name">week13</string>
    <string name="req_permission_reason">App has no permission %1$s. Some features would not work correctly.</string>
    <string name="no_permission">App requires %1$s permission. Could you allow the permission?</string>
</resources>
private fun requestSinglePermission(permission: String) { // 한번에 하나의 권한만 요청하는 예제
        if (checkSelfPermission(permission) == PackageManager.PERMISSION_GRANTED) // 권한 유무 확인
            return
        val requestPermLauncher = registerForActivityResult(ActivityResultContracts.RequestPermission()) { // 권한 요청 컨트랙트
            if (it == false) { // permission is not granted!
                AlertDialog.Builder(this).apply {
                    setTitle("Warning")
                    setMessage(getString(R.string.no_permission, permission))
                }.show()
            }
        }
        if (shouldShowRequestPermissionRationale(permission)) { // 권한 설명 필수 여부 확인
// you should explain the reason why this app needs the permission.
            AlertDialog.Builder(this).apply {
                setTitle("Reason")
                setMessage(getString(R.string.req_permission_reason, permission))
                setPositiveButton("Allow") { _, _ -> requestPermLauncher.launch(permission) }
                setNegativeButton("Deny") { _, _ -> }
            }.show()
        } else {
// should be called in onCreate()
            requestPermLauncher.launch(permission) // 권한 요청 시작
        }
    }
  • AndroidManifest.xml에 권한을 표시하고 설치시에 사용자에게 확인
  • 앱이 실행 중에 권한이 필요할 때 사용자에게 권한 부여 요청

데이터 저장소

  • 내부 저장소
    • 파일 소유한 앱에서만 액세스
    • 상대적으로 크기가 작음
  • 외부 저장소
    • 여러 파티션으로 나누어져 있기도 함
    • SD카드도 여기에 포함
    • 내부 저장소에 비해 공간이 큼
    • 보통 다른 앱과 공유가능한 미디어나 문서 파일 저장
    • 앱 전용 파일도 저장 가능

앱 전용 파일

<내부 저장소>

class MyViewModel(context: Context) : ViewModel() {
	private val fileInternal = File(context.filesDir, "appfile.txt")
	private val fileExternal = // 생략
	var valueInternal: String = readValue(fileInternal)
		set(v) {
			field = v
			writeValue(fileInternal, v)
		}
	var valueExternal // 생략 …
	private fun readValue(file: File) : String {
		return try {
		println("$file")
		// Internal Storage - /data/user/0/com.example.fileexample/files/appfile.txt
		// External Storage - /storage/emulated/0/Android/data/com.example.fileexample/files/appfile.txt
		file.readText(Charsets.UTF_8)
		} catch (e: Exception) {
		""
		}
}
private fun writeValue(file: File, value: String) {
	file.writeText(value, Charsets.UTF_8)
}

<외부 저장소>

class MyViewModel(context: Context) : ViewModel() {
	private val fileInternal = File(context.filesDir, "appfile.txt")
	private val fileExternal =
	if (isExternalStorageMounted) // 외부 저장소 사용 가능 여부 확인 – 다음 슬라이드에 나옴
		File(context.getExternalFilesDir(null), "appfile.txt")
	else
		fileInternal
	var valueInternal: // 생략
	var valueExternal: String = readValue(fileExternal)
	set(v) {
		field = v
		writeValue(fileExternal, v)
	}
	private fun readValue(file: File) : String { // 생략, 앞 슬라이드 참고 }
	private fun writeValue(file: File, value: String) {
	file.writeText(value, Charsets.UTF_8)
	}
	private val isExternalStorageMounted: Boolean
		get() {
			val state = Environment.getExternalStorageState()
			return state == Environment.MEDIA_MOUNTED
		}
  • Context의 저장소 경로 메소드 사용
  • 내부 저장소 또는 외부 저장소 사용
    • 내부 저장소: filesDir 속성, cacheDir 속성
    • 외부 저장소: getExternalFilesDir(null) externalCacheDir 속성(getExternalCacheDir())
  • 다른 앱에서 접근 불가, 앱 삭제 시 함께 삭제됨

프레퍼런스(Preference)

  • 키-값 형식으로 저장, 사용
  • 내부 저장소 사용, 다른 앱 접근 불가, 앱 삭제 시 함께 삭제됨
  • 비휘발성 데이터 저장
  • SharedPreferences 클래스 사용
    • 프레퍼런스의 데이터를 관리하는 클래스
    • *val* pref = PreferenceManager.getDefaultSharedPreferences(*this*)
    • 작업 후 apply() 함수를 통해 결과를 저장
  • 안드로이드 스튜디오에서 Settings Activity, Settings Fragment를 이용하여 쉽게 앱의 설정 UI로 생성 가능

공유 파일

  • 미디어나 문서 파일
  • 외부 저장소 사용, 다른 앱과 공유 가능
  • 공유 데이터 블롭

데이터베이스

  • Room 라이브러리를 이용하여 구조화된 형태로 데이터 저장
  • 예전엔 SQLite로 사용, 지금은 Room 권장

'Development > Kotlin&Android' 카테고리의 다른 글

브로드캐스트 리시버, 컨텐트 리졸버  (0) 2023.06.01
코루틴, 서비스, 권한  (0) 2023.05.30
메뉴와 네비게이션 UI  (0) 2023.05.09
프래그먼트(Fragment)  (0) 2023.04.29
액티비티와 인텐트  (0) 2023.04.13

App Bar (ActionBar)

  • 앱의 상단에 표시됨
  • 타이틀, 액션아이콘, 옵션 메뉴를 표시
  • Toolbar: 레이아웃 내에 한 위젯처럼 취급
  • 생성 방법
    • AppBarConfiguration 생성
    • NavController 와 AppBarConfiguration 연결
    • onSupportNavigateUp() 재정의

액션아이콘 메뉴

  • App Bar에 타이틀 표시하고 남은 공간에 액션 아이콘과 메뉴 아이템을 배치한다. 공간이 부족할시 오버플로우 메뉴 사용
  • 메뉴 작성 방법
    • 메뉴 리소스 정의 - menu/파일이름.xml
      • android:id 학목 식별자
      • android:icon 항목 아이콘
      • android:title 항목 텍스트
      • app:showAsAction
        • alwats: 항상 액션 아이콘 (디폴트 옵션)
        • ifRoom 공간이 가능하면
    • 액티비티의 onCreateOptionsMenu(): 메뉴 생성
    class MainActivity : AppCompatActivity() {
    	override fun onCreate(savedInstanceState: Bundle?) {
    		super.onCreate(savedInstanceState)
    		setContentView(R.layout.activity_main)
    	}
    	override fun onCreateOptionsMenu(menu: Menu?): Boolean {
    		menuInflater.inflate(R.menu.main_menu, menu)
    		// R.menu.main_menu : 리소스 메뉴 파일 이름이 menu/main_menu.xml
    		return true
    	}
    }
    
    • 액티비티의 onOptionsItemSelected(): 메뉴 선택 처리
    class MainActivity : AppCompatActivity() {
    	override fun onCreate(savedInstanceState: Bundle?) { // 생략, 앞 슬라이드 참고 }
    	override fun onCreateOptionsMenu(menu: Menu?): Boolean { // 생략, 앞 슬라이드 참고 }
    	override fun onOptionsItemSelected(item: MenuItem): Boolean {
    		when (item.itemId) {
    			R.id.action_favorite ->
    			println(“action_favorite 선택”)
    			R.id.action_settings ->
    			println(“action_settings 선택”)
    			R.id.navDrawer ->
    				startActivity(Intent(this, MainActivityDrawer::class.java))
    			R.id.navBottom ->
    				startActivity(Intent(this, MainActivityBottomNav::class.java))
    			else -> return super.onOptionsItemSelected(item)
    	}
    	return true
    }
    
    팝업 메뉴
    • 안드로이드에서 메뉴 종류
      • 옵션 메뉴, 팝업 메뉴
      • 컨텍스트 메뉴: 롱클릭시 해당 항목과 관련된 메뉴 표시
    • 팝업 메뉴 Jetpack의 androidx.appcompat.widget.PopupMenu
    private fun showPopup(v: View) { // v는 팝업 메뉴를 보여줄 뷰, 클릭한 뷰를 보통 사용
    	PopupMenu(requireContext(), v).apply { // requireContext()는 프래그먼트에서
    		inflate(R.menu.nav_menu) // 메뉴 리소스로 메뉴 생성
    		setOnMenuItemClickListener { // 메뉴 선택 처리를 위한 리스너
    			when (it.itemId) {
    				R.id.homeFragment -> {
    						Snackbar.make(v, "HomeFragment", Snackbar.LENGTH_SHORT).show()
    						true
    				}
    				else -> false
    			}
    		}
    	}.show() // 팝업 메뉴 나타나게 함
    }
    

다이얼로그

class OkCancelDialogFragment : DialogFragment() {
	override fun onCreateDialog(savedInstanceState: Bundle?): Dialog {
		isCancelable = false // 다이얼로그 외부 클릭시 사라지지 않도록 함
		return AlertDialog.Builder(requireActivity()).apply {
			setMessage("OK-CANCEL Dialog")
			setPositiveButton("OK") { dialog, id -> println("OK")}
			setNegativeButton("CANCEL") { dialog, id -> println("CANCEL")}
		}.create() // Dialog 객체 생성
	}
}
  • DialogFragment내에서 생성 클래스
    • AlertDialog
    • DatePickerDialog, TimePickerDialog

다이얼로그 - DatePickerDialog

class DatePickerFragment : DialogFragment(), DatePickerDialog.OnDateSetListener {
	override fun onCreateDialog(savedInstanceState: Bundle?): Dialog {
		return DatePickerDialog(requireContext(), this,
						2021, 4, 5) // Jan: 0, Feb:1, Mar:2, Apr: 3, May:4 ...
	}
	override fun onDateSet(view: DatePicker?, year: Int, month: Int, dayOfMonth: Int) {
		println("$year, $month, $dayOfMonth")
	}
}

다이얼로그 - 커스텀 다이로그 (바텀 다이얼로그)

class MyBottomSheetDialog : BottomSheetDialogFragment() {
	private val myViewModel: MyViewModel by activityViewModels()
	override fun onCreateView(inflater: LayoutInflater, container: ViewGroup?,
		savedInstanceState: Bundle?
	): View {
		isCancelable = false
		return inflater.inflate(R.layout.my_bottom_dialog, container,false)
	}

	override fun onViewCreated(view: View, savedInstanceState: Bundle?) {
		view.findViewById<EditText>(R.id.editTextName)?.setText(myViewModel.nameLiveData.value)
		view.findViewById<Button>(R.id.buttonOk)?.setOnClickListener {
		myViewModel.nameLiveData.value = view.findViewById<EditText>(R.id.editTextName)?.text.toString()
		dismiss()
	}
}
  • 일반 다이올로그는 BottomSheetDialogFragment 대신 DialogFragment를 사용하면 된다.

'Development > Kotlin&Android' 카테고리의 다른 글

코루틴, 서비스, 권한  (0) 2023.05.30
안드로이드 데이터 저장 방식  (0) 2023.05.18
프래그먼트(Fragment)  (0) 2023.04.29
액티비티와 인텐트  (0) 2023.04.13
안드로이드-레이아웃  (0) 2023.03.30

프래그먼트

dependencies{
	//
	implementation 'androidx.fragment:fragment-ktx:1.5.7'
}
import androidx.fragment.app.Fragment

class ExampleFragment : Fragment(R.layout.example_fragment)
  • 재사용가능한 사용자 UI 모듈
  • 화면 구성 요소의 단위
  • 독자적으로 레이아웃이나 입력 처리 등이 가능
  • 독립적으로 존재할 수 없고 액티비티나 다른 프래그먼트 내에 만들어져야 한다.

프래그먼트를 액티비티에 넣기

  • 액티비티 레이아웃 XML에 정적으로 넣기

	**<androidx.fragment.app.fragmentcontainerview** android:id="@+id/fragment" **android:name="com.example.fragment_test.ExampleFragment" **="" android:layout_width="match_parent" android:layout_height="match_parent" app:layout_constraintstart_tostartof="parent" app:layout_constrainttop_totopof="parent">

</androidx.fragment.app.fragmentcontainerview**>
  • 동적으로 넣기 또는 교체
findViewById<Button>(R.id.buttonReplace)?.setOnClickListener {
	**supportFragmentManager**.commit { // this: FragmentTransaction
		setReorderingAllowed(true)
		replace(R.id.fragment, ExampleFragment2::class.java, null)
		addToBackStack(null)
	}
}
  • FragmentManager와 FragmentTrasaction을 이용하여 프래그먼트를 동적으로 넣고(add) 교체(replace) 할 수 있음

프래그먼트와 ViewModel

class ListFruitsFragment : Fragment(R.layout.list_fruits) {
	private val viewModel: MyViewModel **by activityViewModels()**

	override fun onViewCreated(view: View, savedInstanceState: Bundle?) {
		super.onViewCreated(view, savedInstanceState)
		// radio 버튼에 체크된 값을 저장하는 내용의 람다함수
		val radioGroup = view.findViewById<RadioGroup>(R.id.radioGroup)
		radioGroup.setOnCheckedChangeListener { _, checkedId ->
			viewModel.selectLiveData.value = checkedId
		}
	}
}
class DetailFruitFragment : Fragment(R.layout.detail_fruit) {
	private val viewModel: MyViewModel **by activityViewModels()**

	override fun onViewCreated(view: View, savedInstanceState: Bundle?) {
		super.onViewCreated(view, savedInstanceState)
		// 선택된 값이 textView 표시하는 람다함수
		// 프래그먼트(this)를 쓰지 않는 이유: View가 없어진 후에 프래그먼트가 
    //살아있는 경우가 있는데, 이때 View 업데이트 시 문제가 되기 때문
		**viewModel.selectLiveData.observe(viewLifecycleOwner)** { // it: Int!
			val tv = view.findViewById<TextView>(R.id.textViewName)
			tv.text = "$it"
		}
	}
}
  • 액티비티와 프래그먼트 간에 또는 프래그먼트들 끼리 데이터를 공유할 수 있는 방법으로 ViewModel 을 사용할 수 있다.
  • LiveData와 함께 쓰는 것이 좋다.
  • 단 ViewModel 객체에 대해 액티비티와 프래그먼트가 다른 delegate를 사용한다.

네비게이션 그래프

<사전 작업>

  • NavHost를 액티비티 레이아웃에 추가
  • 네비게이션에서 목적지 화면으로 사용할 프래그먼트를 준비
  • 네비게이션 디자인에서 목적지(destination) 추가
class HomeFragment : Fragment(R.layout.home_fragment) {
	override fun onViewCreated(view: View, savedInstanceState: Bundle?) {
		super.onViewCreated(view, savedInstanceState)

		view.findViewById<Button>(R.id.button)?.setOnClickListener {
			**findNavController().navigate(R.id.action_homeFragment_to_nav1Fragment)**
		}
	}
}
  • 앱 UI는 일반적으로 여러 화면(프래그먼트)을 이동하면서 사용
  • Jetpack Navigation은 이러한 화면 이동을 쉽게 구현하도록 도와 줌
  • Navigation의 주요 요소
    • Navigation 그래프 - XML로 작성된 네비게이션 관련 정보를 기술
    • NavHost - Navigation 그래프에서 현재 보여질 목적지를 보여줌
      • NavHostFragment - 프래금너트를 이용한 네비게이션을 위한 NavHost
    • NavController - NavHost의 목적지 변경 등의 제어를

'Development > Kotlin&Android' 카테고리의 다른 글

안드로이드 데이터 저장 방식  (0) 2023.05.18
메뉴와 네비게이션 UI  (0) 2023.05.09
액티비티와 인텐트  (0) 2023.04.13
안드로이드-레이아웃  (0) 2023.03.30
Kotlin 문법 Part 4  (0) 2023.03.23

액티비티

  • 앱의 구성 요소, 사용자와 상호작용할 수 있는 화면(UI)
  • 앱은 2개이상의 액티비티를 포함한다.
  • AppCompatActivity를 상속하여 만듬
  • 사용법: Acitvity Mainfest 파일 생성 → 액티비티 등록
<manifest xmlns:android="http://schemas.android.com/apk/res/android">
	<application… 생략 … >
		<activity android:name=".MainActivity“ android:exported="true">
			<intent-filter>
				<action android:name="android.intent.action.MAIN" />
				<category android:name="android.intent.category.LAUNCHER" />
			</intent-filter>
		</activity>
	</application>
</manifest>
class MainActivity : AppCompatActivity() {
	override fun onCreate(savedInstanceState: Bundle?) {
	super.onCreate(savedInstanceState)
	**setContentView(R.layout.activity_main)**
	}
}

액티비티 라이프 사이클

  • onCreate(): 액티비티 생성 
  • onStart(): 화면에 표시시 호출 액티비티가 사용자에게 보여지기 시작 함
  • onResume(): 사용자 명령을 받고 실행시 호출 사용자와 상호작용이 가능해
  • 액티비티 활성화
  • onPause(): 액티비티 화면의 일부가 가리게 된다면 호출
  • onStop(): 액티비티 화면 전부가 가려지게 된다면 호출
  • onDestroy(): 완전히 메모리가 사라진다면 호출

인텐트

  • 일종의 메시지 객체
  • 다른 앱 구성 요소에 작업을 요청할때 사용
  • 예시: startActivity(Intent) 메소드를 사용할때 사용

인텐트 유형

  • 명시적 인텐트: 대상 지정(필요한 Action 지정)
  • 암시적 인텐트: 대상 미지정, 일반적인 작업
    • 인텐트 필터: 받으려는 데이터에 대한 스키마
<activity android:name=".SecondActivity" android:exported="false">
	<intent-filter>
		<action android:name="android.intent.action.DIAL" />
		<category android:name="android.intent.category.DEFAULT" />
		<data android:scheme="tel" />
	</intent-filter>
</activity>

MVVM 패턴

  • Model-View-ViewModel
  • 뷰와 모델을 분리하는 대표적인 소프트웨어 아키텍처 패턴
  • 안드로이드 Jetpack의 ViewModel클래스를 사용하여 구현 가능

'Development > Kotlin&Android' 카테고리의 다른 글

메뉴와 네비게이션 UI  (0) 2023.05.09
프래그먼트(Fragment)  (0) 2023.04.29
안드로이드-레이아웃  (0) 2023.03.30
Kotlin 문법 Part 4  (0) 2023.03.23
Kotlin 문법 Part 3  (0) 2023.03.16

+ Recent posts